Friday, April 30, 2010

Day Seven -- Painting Trim, Trim, and More Trim

Today's goal was to paint all the trim. First step: *find* all the trim. I made it through Geometry on theory. Spatial relationships never did it for me. So it took a while to realize the reason I had so many window trims was because half of them were for the *inside* of the house. Once I got them all lined up, I started on the door. Argh. Painting around the finished plum part was -- problematical. Then I did the door trim and all the window pieces. Including the panels which (may or may not) get stenciled. The instructions say to paint both sides of the panels for stability. Never mentions that the edges must get painted as well, or give hints as to how the @##!$% one is supposed to do that. I also painted the panel cores plum (those are the parts the panels get glued to). Those edges have to get painted as well. First coat I did the top and bottom edges -- second coat I did the side edges. And decided I could live with one coat on those edges. Here's the first coat on all of it:


As you can see, the door edges need some work:


I tried to use some painter's tape that Mike had, but all it stuck to were my fingers. So I'm a bit perplexed as to how to tackle that. And I didn't even attempt to paint the white panels on the door. Lots of trim edges on both the door and windows still need paint.

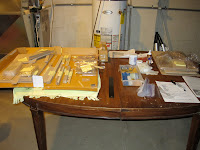
Here's the second coat, with the pieces lined up in the way they will eventually go together; from the left, the door, the door trim, two big windows, inside and out, top right is the little attic window, in and out, with the panels and cores for the three windows below right:


Some how, there don't seem to be as many when lined up that way. I may have to do yet a third coat, as I didn't prime these pieces and they kind of sucked up the first coat.

The woman at the dollhouse store (I should find out what her name is) suggested old screens as drying racks. Especially for the shingles, once they're stained (they take two days to dry!). We have plenty of screen windows we aren't using, but Mike was hesitant for me to use them, ("Like bloody hell!") in case whoever buys this place from us ever wants to use them. So I took one and covered it with parchment paper. I doubt that will work well for the shingles, so I plan on spending time this weekend whining to Mike until he makes me a rack I can use.

Thursday, April 29, 2010

Day Six -- still painting

Tried the lower floor ceiling again today. This time using 'Bright Life Interior latex satin gloss enamel' in the color 'white white,' which is a rather weird color name. I mean, what are the alternatives? Blue white? Pink white? Anyway, here's the first coat, and, yes, it really is this shiny, and, no, it isn't all that white, is it?:


The second coat went on easily, although I'm not sure I'm going to like the finished product after it's totally dry tomorrow. There are streaky lines and bumps (see second photo):


I decided to go ahead and paint the door. My kit, being a 'special edition,' had the door pre-assembled, which I'm thinking is the only way to go. Except that, being pre-assembled, painting it was a bit of a challenge. Trying to get paint onto the edges without getting it on the trim, for example. After I started with the plum paint, it occurred to me that maybe I should have painted the entire thing white first, since the panels and the trim will be white. Then I could have painted the main body of the door. Of course, then I would have gotten blotches of plum on the white panels and would be complaining that I should have done the plum first:


After painting the main part of the door, I realized that the edges need to be painted as well:


After the second coat:


See the blotch? The other side of the door (facing the interior) will be white, I guess. And what about a door knob?

A word about paint. The two main colors for the house, lilac and plum, I bought at the miniature store when I bought the dollhouse kit. Rather than charge me a lot of money for the white I would need, I was advised to buy it at my local home improvement center. Good, economical advice, especially as this is my first attempt -- and possibly my last, the way it's going now. But, should I ever do another dollhouse, I'm buying *all* my paint from the miniature store. They sell quality stuff, which was driven home to me after buying that crappy textured white stuff at my local crafting store, and the disappointing blue I used on the upper floor ceiling. The jury is still out on the rose and green I bought for stenciling.

Wednesday, April 28, 2010

Day five -- Painting the ceilings

Time to paint the ceilings. Since I was (note the use of *was*) going to paint clouds on the upper level ceilings, I tried my hand at some samples on cardboard. Like light clouds:


And stormy clouds:


And very light clouds:


So okay, maybe I won't do clouds. So I did one coat of sky blue:


No, really, that's the color. From a distance the paint job didn't looks so bad, but close up it was awful:


Second coat wasn't so bad, but I'm thinking a third is called for.


I didn't take a picture of what the downstairs ceiling looked like because I was so shocked and disappointed that I immediately wiped it clean. I had bought a textured white paint that was supposed to look like that sound-proofing cottage cheese stuff, but, although it was advertised as white, when it was painted on it looked like blue sparkles in clumps. Guess I'll go back to plain white. It's not like that ceiling shows.

Stenciling -- Who knew it was this hard?

I tried my hand at stenciling. First try was fairly sad:


Mike suggested that painting on bare cardboard might have made the paint run, so maybe putting down a coat of white first would help. It really didn't:


So I finally decided to wander through the Internet to learn how to do it. Apparently I was doing at least two things wrong. First, the paint brush should be dry. Dab it in the paint and then brush most of it off. Then the paint should be applied by 'dabbling,' not 'brushing.' The results this time were marginally better:


However, it would appear that I need lots more practice before attempting it on the real pieces for the dollhouse. Or decide that un-stenciled windows and doors still look fine.

Tuesday, April 27, 2010

Uh oh


Instead of actually *doing* anything progressive about the dollhouse, I've been stressing over what I might have done wrong. Here's the official picture of the finished product from the manufacturer:


Those more clever than I will immediately notice that the shutters are painted the same green as the trim (plum in my version). I forgot that when I separating out pieces to paint. And the doors and windows are painted white. Hadn't planned the timing on that, although I haven't actually done anything that would make painting them later problematical.

I did buy rose and green paints for the stencils, which I will try on cardboard first.

I also noticed (it might be hard to see in the picture) that the gable triangle has shutters which have been painted pink (lilac for mine). So I shouldn't have painted the gable triangle yet. Here's hoping the glue works as well on painted wood as the raw stuff or I'll have far too much sandpapering ahead of me.


Day four -- trim, trim, trim

Satisfied with the outcome of two coats on the exterior walls, it was time to paint the trim, which I started yesterday. However, I realized later that there was more trim than just the gingerbread. Like the flower boxes and porch posts. The picture of the finished house also has the trim color along the side of the house, in the vertical line between the sides and front, but I don’t think that’s a trim piece. So I’m holding off on that until the house is assembled. Then I’ll use painter’s tape to cover the walls and paint that edge.


I realized this morning that the undersides of the gingerbread also need to be painted and that I should have done that first. Too late. And probably hit the gingerbread with a little sandpaper before painting, as the edges were a bit rough. Again, too late.


So, here’s what I painted this morning:


The two little pieces on the top of the photo are the window boxes. The half-painted sticks are the porch posts. They have little holes in the bottom for fitting through dowels (I think) to secure them to the porch). Next time, it would be easier to mount the posts through these hole on a piece of board with nails to facilitate painting.


Here are the bottom edges of the gingerbread:


The porch rails:


The window boxes:


I have some doubts about those window boxes, as they are of a different composition than everything else I’ve painted. Hopefully I’ve correctly identified them.


I also realized that I haven’t painted the porch floor yet. What color is that supposed to be anyway? And what about the foundations pieces? They need to be finished, but in the same lilac as the house? Surely not plum, like the trim. White? How about dirt color?


Next time, use a tarp instead of newspaper and build a drying rack. Which I need anyway for drying all the shingles. And by “all,” I mean about 650 of them.

Day three -- Two coats of exterior paint, one for some trim

Next step: paint the exterior walls. I used two coats of hte lilac paint. Here’s the first (the color doesn’t show well):


Here’s a close-up:


Then, after I did the second coat, I did the first coat on the gingerbread trim (I still need to do several other trim pieces, but didn’t have room to sort through everything to find them):


Day two (later) -- finish the hardwood floors


Next step was to finish the hardwood floors. Again, Mike had stain for me to choose from. Apparently I choose his favorite -- a light oak. To tell the truth, I didn’t see any difference when they were done. Two coats, half an hour apart, and then wiped clean after fifteen minutes. Here’s the first coat:


Here’s the final product:


Day two -- Prime the ceilings and exterior walls


First order of business was to prime the exterior walls and the ceilings. The woman at the miniature store said it wasn’t necessary to prime the interior walls. Mike gave me some white latex primer he has used on the house, with which I did these (upper floor ceiling in the middle, lower floor ceiling to the right, garret exterior (the triangle) and porch ceiling:


And these are the exterior walls (the front on top and the two side walls:


I only put on one coat.

Day one -- identify everything!

The first task was to identify all the pieces. Somehow these pictures do not do justice to the incredible number of pieces there are:


I had a bit of a problem as I ended up with four extra pieces and no “groove fill,” but Mike was able to figure out that three of those were the door trim. I’m hoping the fourth is the groove fill, although it isn’t exactly the specified size. As of this writing, I haven’t had to deal with any of the marginally identified pieces.


What it's supposed to look like

This is a picture I took for the dollhouse (Victorian Cottage Jr.) at the miniature store in Greensburg:


These shutters and the door are not stenciled, which I plan to do. My colors are lilac with plum trim.


Here’s the inside:


I’m going to try to paint the upper floor ceiling with sky blue paint and clouds. I haven’t made any decisions about interior colors or paint. Or moldings. My kit has the hardwood floors.