Monday, May 24, 2010

Day 20 -- Still Adding Finishing Touches

Remarkably many photos for remarkably little work.

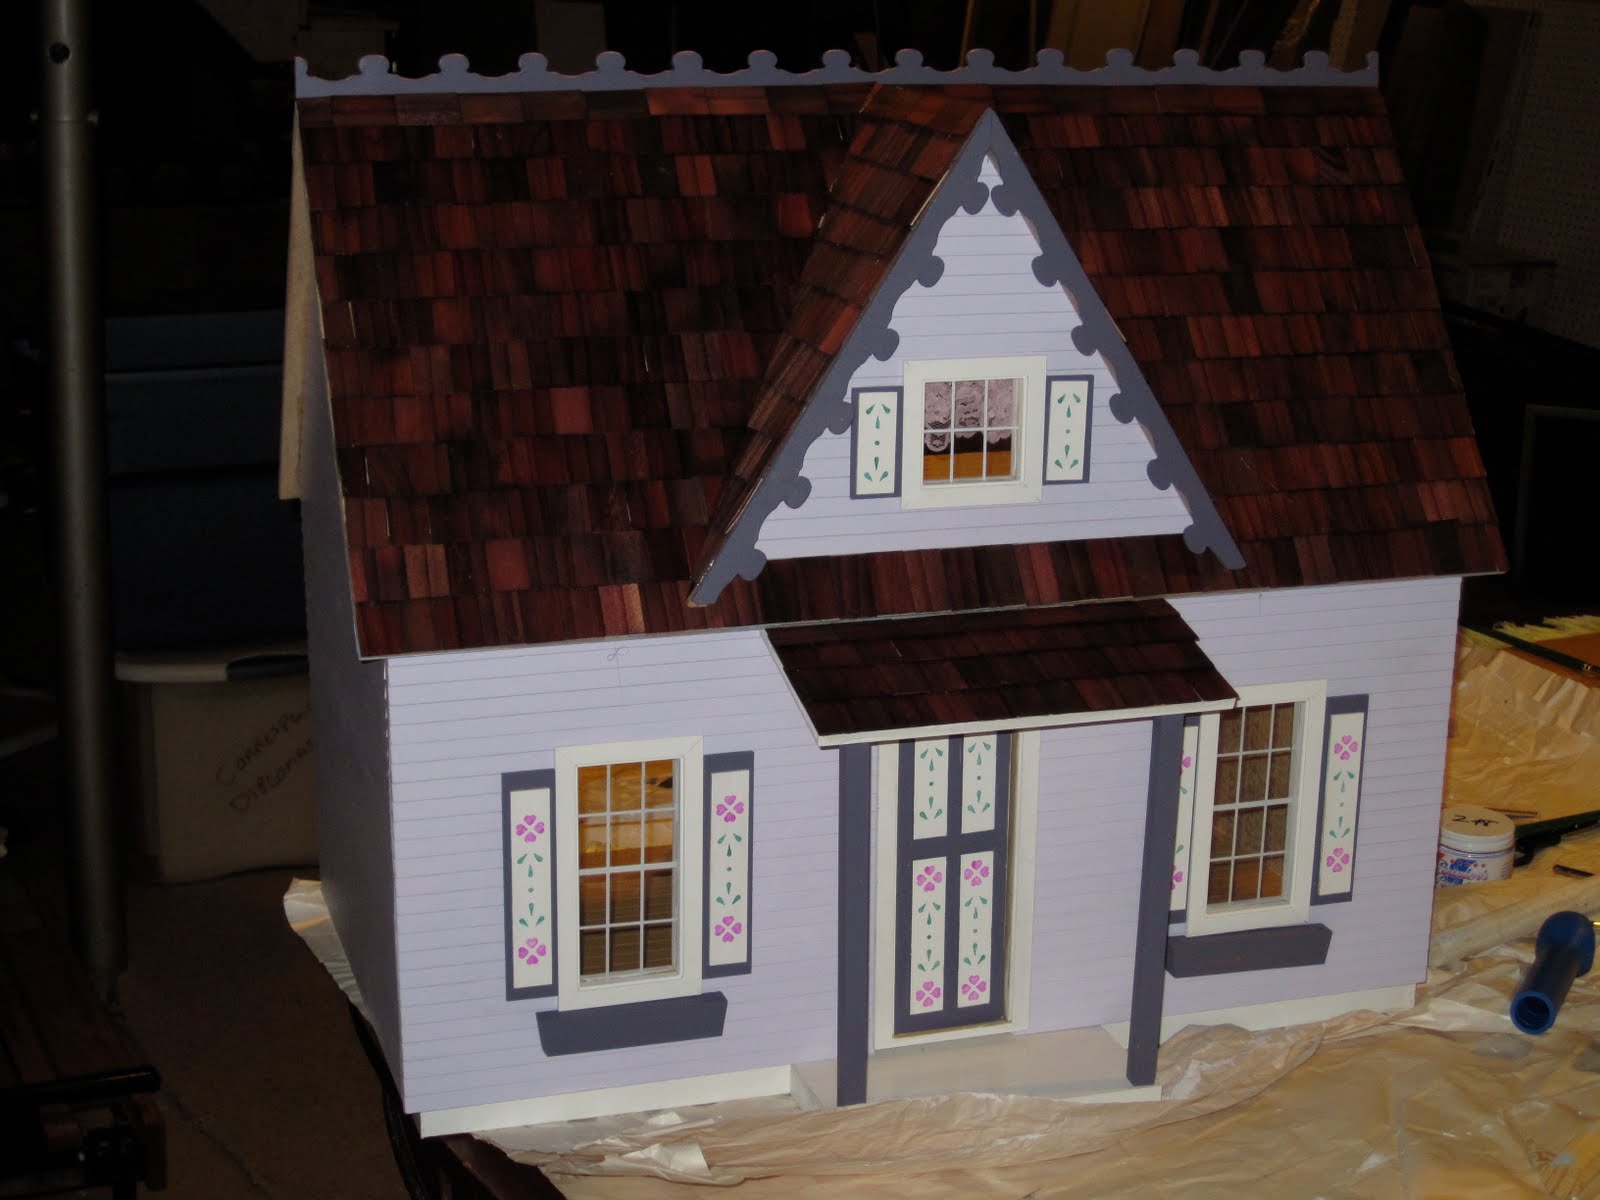
The front of the house with all but the side trims glued on:


Copied and framed some artwork (my mother and her father on her wedding day, me as a little girl, Mom as a young woman, a crossstitched monarch butterfly):


Problem. There is a base for the floor which gets glued under the door. But it doesn't fit! I put the door in as high as I could, but there's not enough clearance. Solution? (1) Ferget about it (2) let Mike shave it. I'm thinking (1).


Glued on the side gingerbread. There is very little holding this on. I couldn't tape it to the shingles without taking some shingle dye off, so I'm worried about tomorrow when I take the tape off. Mike may have to get out his trusty little hammer and start nailing:


Glued the stringer onto the stairs and the stairs onto the house:


The other side's gingerbread:

Oops. Need to paint that blip on the side of the gingerbread (both ends):


From a distance it looks pretty good:


Close-up? Not so much. I have a drunken flower box which needs to come off and get repositioned:

Of course, the big decision is still pending. Do I feel comfortable enough with my construction that this dollhouse will stand up to the wear and tear of four little girls? Of course, if I don't give it to them, that means I keep it for myself, which may make Mike wonder about whether or not I've entered some kind of second childhood. I suppose it depends on how much better I am at building a second one.

Things I've learned

(1) Identify every piece.
(2) Dry fit everything before installing anything.
(3) Decide on a complete color scheme -- paint and paper -- *before* beginning.
(4) Get a pencil and mark *every* surface with the color to be painted.
(5) Put a tarp on the table, not newspaper.
(6) Check to see if there's a pdf of instructions from the manufacturer and compare it to the instructions that come with the model.
(7) Write out detailed instructions for myself of every step to follow.
(8) Ask Mike to review my instructions and make (inevitable) suggestions for doing it better.
(9) Ask Mike for help frequently *before* proceeding to do something wrong.
(10) Design some kind of rack for holding pieces to be painted.
(11) Prime everything to be painted.
(12) Keep it simple.

Sunday, May 23, 2010

Day 19 -- More help from Mike

I found more glue and finished the interior wallpaper, glued in the partition downstairs and put in the windows:


I tried to put in the door but got confused -- do I put it in from the inside or the outside? The instruction manual was less than helpful, as all it said was, "Install the door." But an email to Judy at the dollhouse store (and with help again from Mike), problem solved.

Meanwhile, I glued on the shutters and window boxes for the downstairs windows:


Then the Miracle Man showed up with his mighty Dremel and trimmed the shingles even with the sides of the house:


Next time, I'n not cutting the shingles before gluing them on. Not when Mike has a dremel that shapes them up so easily.

Day 19 -- "I've got a tool for that"

The plan for today was to at least finish the downstairs wallpaper. Because my previous attempt at cutting a template for the staircase wall had resulted in a trip back to the hobby store to buy more paper, I asked Mike if he had a better measuring device for real precision. He gave me the use of a carpenter's ruler. He was explaining how to use it on something other than the dollhouse, but I got confused, which led him to demonstrate on the actual wall to be measured, watching me as I did it. And (gently -- very, very gently) -- pointing out better ways to measure. Happy, I went and cut a template, took it to the house to check and realized I had cut a divot out down instead of up for the stair at the top of the wall.

Which led me to the depressing realization that Mike must have married me for my looks instead of my brain, which, although not as sharp as it once was has still faired much better than my looks.

Chagrined, I mentioned this to him and he responded, "I have a tool for that, too." Lots of them:


Again, under his careful tutelage, I measured a template. As I was about to cut, he said he found it a good thing at this point to mark out the lines I wouldn't be cutting:


Clever boy.

So I cut the template, tried it out for size and prepared to cut the actual wallpaper. Mike saw this and said, "I've found that it's more actuate to measure the piece to be cut again, rather than use the template to draw cutting lines." A nonbeliever, I marked the lines from the template onto the paper (backwards, until he pointed this out) and then measured. Hmm... He was right. The dots are from the template, the lines from measuring:


Then the gluing -- a perfect fit!


Unfortunately, at this point I ran out of glue. I cut the remaining pieces for the back wall of the living room and the side and back wall for the kitchen and now wait for a trip to the store for more glue. Once these pieces are in place, I can set in the stairs, windows and door, glue on the shutters and door trim and affix curtains.

W00t! Time to start picking out the next model.

Saturday, May 22, 2010

Day 18 -- Finishing up but not done yet

I painted the ledge between floors white, using painter's tape to keep it off the floor. Then I wallpapered the upper floor side.

Then I took off the tape I had papered over and papered again. Argh...:


Put in the window in the upper floor. Those are shadows on the side of the triangle, not spaces I forgot to paper. I didn't glue in the window because it was such a tight fit. Possible mistake:


Glued on the shutters on the outside of the upper window:


Glued a little curtain on the window:


I found some paper frames in a package for scrapebooking and copied some old photos to put in them. There are two so far (not glued in); one of me as a little girl and one of my mother as a young woman. I'll get some photos of family members from other ancestry lines for the others:


I took the door off its hinges and turned it around, so painting the wrong side wasn't the trauma it might have been. I tried to wallpaper the downstairs, but didn't cut the template correctly, so I had to go back to the store and get more paper to use. I found some pretty white lace long enough for the downstairs windows which I will install as sheers and possibly make paper curtains for those long windows. Haven't decided, but I bought the paper to do it, having found a website that gives detailed instructions that seem simple enough, even for me.

Thursday, May 20, 2010

Day Seventeen -- I should be done

I pried off the top row of shingles from the gable triangle (that proved remarkably easy to do, which makes me very nervous) and redid them to touch at the top:


Then glued on the gingerbread on the front:


Painted the inside of the gable triangle where I had missed before -- unfortunately, I ran out of the blue I had used, so it had to be white:


Wallpapered the living room side of the divider for downstairs:


And the kitchen side:


Papered the gable triangle inside and glued in the dividers upstairs:


Measured the walls for the downstairs wallpaper and realized I need to buy another sheet for both the kitchen and the living room sides. That's when I saw that there's another edge that needs to be painted (dividing the two floors. And the side rails on the house needed to be painted and cut, but I'm waiting for Mike to figure out how to cut them. Here they are, half-painted:

Really, there's very little left to do. Install the windows and door, the flower boxes, the side rails and the gingerbread on the two sides of the house. Glue together the stairs and put them in (after wallpapering downstairs). Finish the wallpaper upstairs.

I was feeling pretty good about all this when I realized that I had painted the wrong side of the door. Yes, I painted the outside of the door white and the inside of the door plum with stencils. That's when I put it down for the day. I need a clear head to figure this one out.

I almost put the window into the gable triangle when I saw that an area I thought would not show, and hence did not paint, does indeed show and needs painting.

ARGH!!

Wednesday, May 19, 2010

Day Sixteen -- Shingles (and a little more)

Finally! Time to shingle. It was a slow process, mostly because the glue fumes were making me giddy. Shingling begins in the valley between the gable triangle and the front roof. This entailed cutting the shingles in half, and I quickly learned why I got so many extra shingles. Cutting with scissors almost guaranteed that half of the shingle would be wasted. Cutting with a boxcutter yielded better results, but I honestly don't like those things -- they make me nervous. Mike said he had a better tool, but using it would have meant waiting for him to be here to (1) find it and (2) show me how to use it.

I didn't wait.

Stage one:


Stage two:


The instructions say to glue the last line of shingles both to the roof and to the gingerbread (that scalloped thing on top), but I decided that was impossible, so I glued to the roof and hoped for the best. Judy, from the dollhouse store, assured me that she puts the top row on sideways, as I did. That made a whole lot less cutting, which made me happy. The porch roof is shingled, too:


Finally, the back:


None of these pictures are close-ups because I'm not overly proud of the finished product. I hope that jar of leftover dye is still in the refrigerator to touch up some little gaps I ended up with. Mike assures me he has a tool which will slice off the shingle edges which hang over the side edges where some more gingerbread will be glued. This one I'm waiting for.

There is a gap where the two sides of the gable triangle 'meet.' Mike thinks he can fix that. I'll let him:


Finished stenciling the front door:


Then, with time on my hands, I started papering the partitions which will divide the rooms. These are the two sides of the middle room upstairs:


One little bedroom upstairs:


The other:

I stopped, although I have the paper for the living room and kitchen downstairs. I'm going to let my engineer husband measure the exterior/interior walls so I can cut the paper to fit.

Then there will be lots of touch-up paint work before installing the stairs, windows and front door. After which, there will only be decorating to do. I bought some tiny frames for pictures of grandparents, great-grandparents and great-great-grandparents.

Holy cow -- I'm almost done!

Tuesday, May 18, 2010

Day Fifteen -- A little of this, a little of that

Time to attach the porch. Glue it to the foundation and wait for it to dry:


While that happened, I finished the stenciling and glued the panels to the plum backs. They get glued to the front of the house after all painting is done:


After the porch floor dried, the porch posts get glued -- attach the little dowels to the posts:


Then glue them to the foundation and glue the porch roof onto the house. Another maneuver which would have gone so much better with several more hands. It was tricky to get the porch roof glued onto the house and, at the same time, glue the posts to the roof:


Tape, tape, tape, tape:


After some more time for drying, glue the gingerbread onto the top: